

I’ve been encouraged lately by all of the Rust and Serverless content that has been posted on various platforms. I’ve also been public about the fact that I believe that Rust adoption with Serverless would be further along if there was more quality content written on the topic. I know for certain that there is interest from developers about whether they should and how would they introduce Rust into their builds and while I’ve tackled pieces of the puzzle, I haven’t taken on a fully working CRUD API. This article looks to change that. Let’s dive into building an API with Rust and Lambda.
API With Rust and Lambda
Before diving into the code, let’s take a look at the designed implementation. This design is probably similar to the ones you’ve implemented yourself in other languages. For a quick aside, this article isn’t intended to start or continue any debates on Lambda per endpoint (verb) vs monolithic Lambdas but to walkthrough an approach for designing your API with Rust and Lambda.
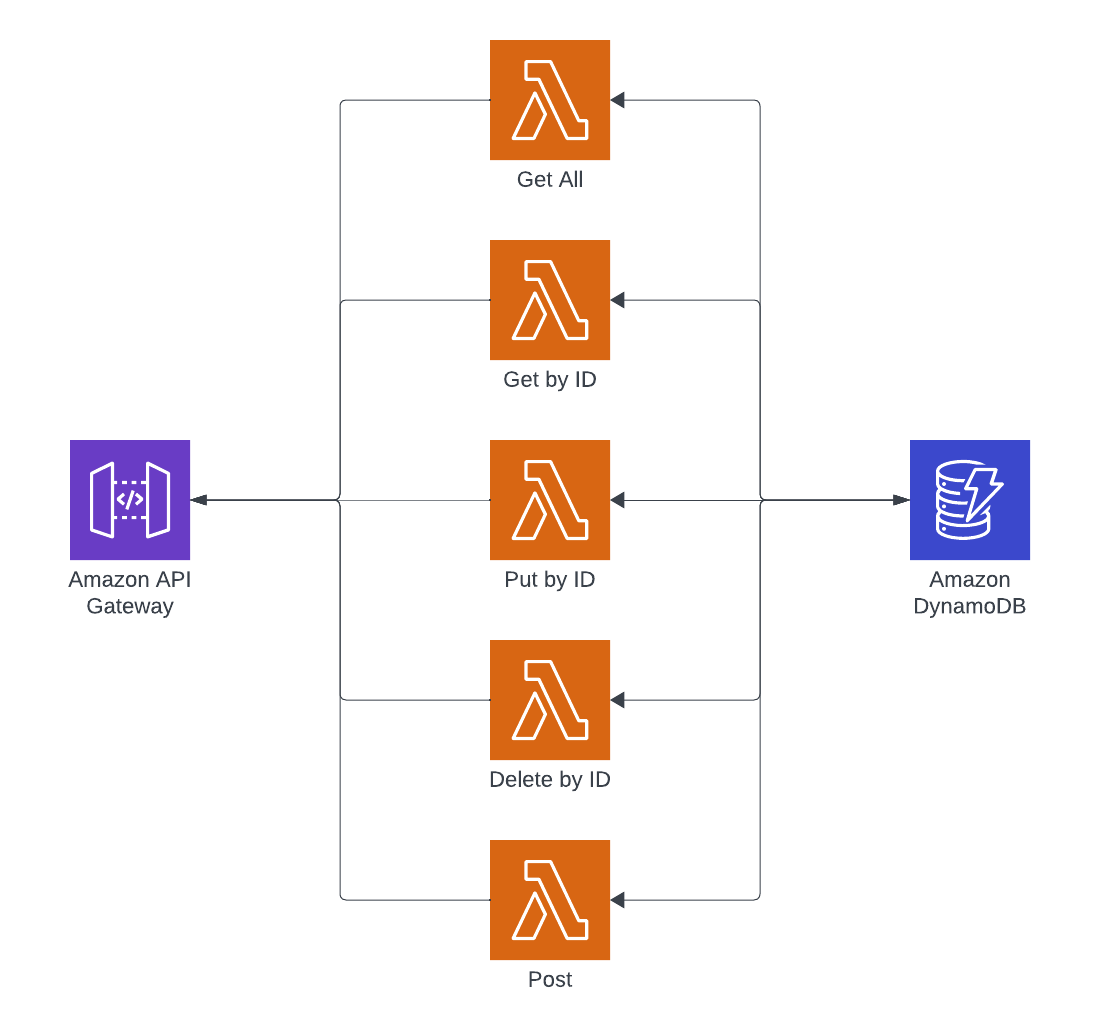
With any REST-based Create, Read, Update, and Delete API, there will be paths for each operation that support the different verbs. The API in this article will cover the following endpoints.
/POST – create new Items/GET – fetches all items (supports pagination)=/{id}– GET – fetches an item by id/{id}– PUT – updates an item by id/{id}– DELETE – deletes an item by id
Why Rust Again
I’ve shared these in serval places but for a recap on why I’m so focused and interested in seeing Rust more in the Serverless ecosystem.
- The language
- Enums are so powerful
- Functional and OOP concepts are easy to reach for
- Crates are maybe the best package management setup I’ve worked with
- Type safety and no garbage collection (once you get over the borrow checker)
- Performance – not much to say here, Rust is fast
- Consumption of resources – I strongly believe in sustainability, and Rust helps with that as it uses so little compared to so many others
- The Serverless Experience
And if you still want to look around at more of my reasons, you can find them at that link.
Project Setup
Before digging into the Lambdas, I want to share the project setup and the Rust-specific callouts. This structure is a great way to build an API with Rust and Lambda.
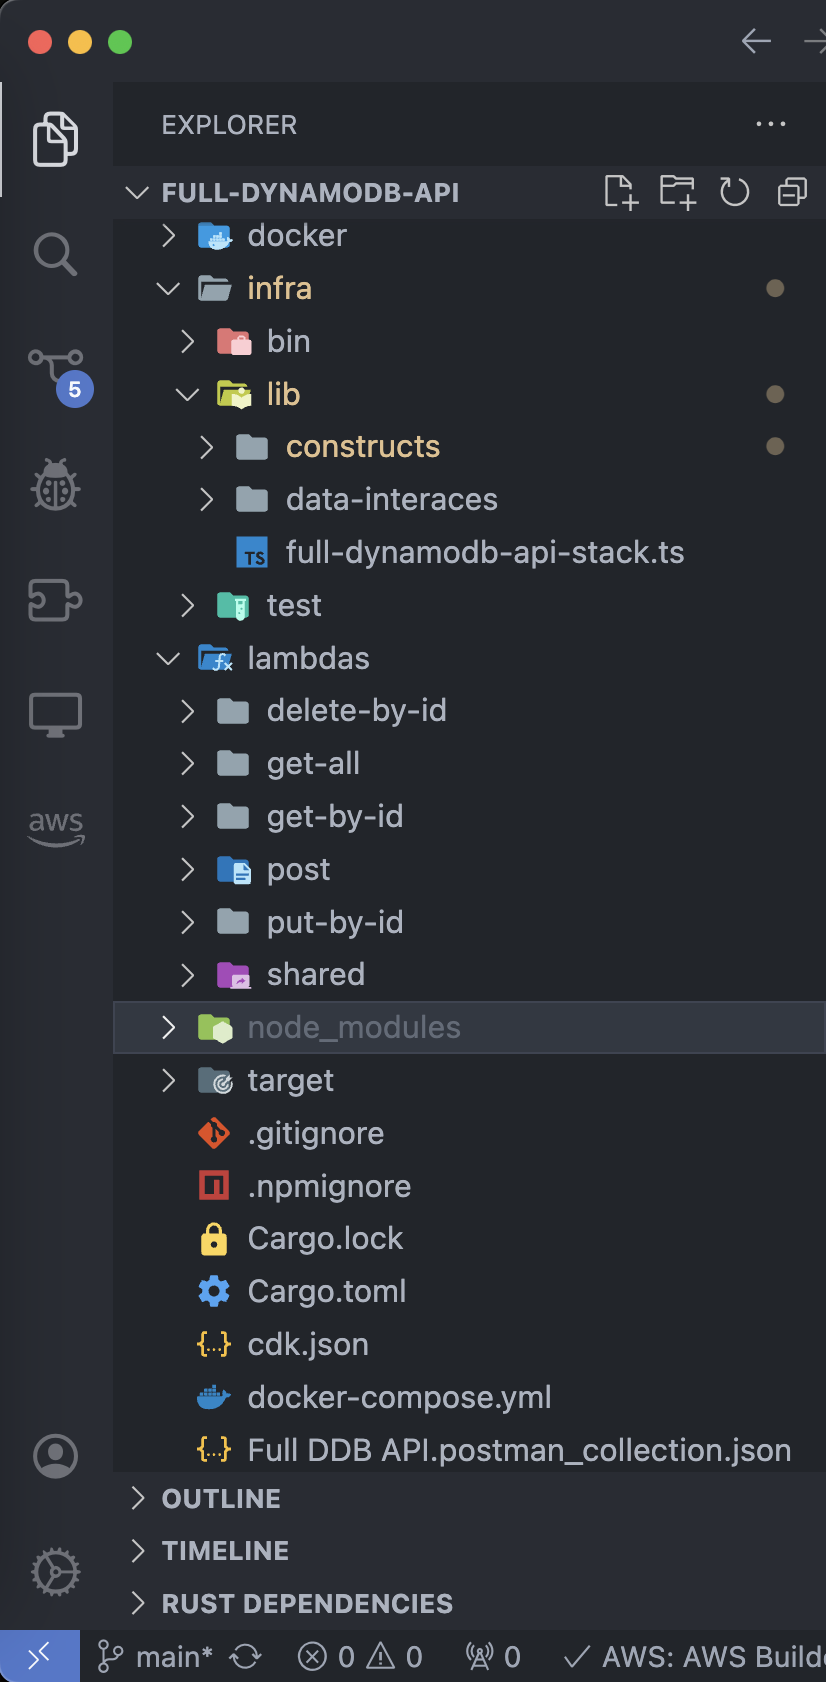
CDK
Breaking down that layout, I prefer to organize my CDK code in the infra directory. I like to put my contructs in one place as well under the lib directory. And then I put my stack building code in bin. I find that just separating my infra from my application source code allows me to collapse my brain when I’m not working on that part of the application.
Lambdas
When building an API with Rust and Lambda you can either package everything up in one Lambda or break the endpoints up into separate functions. For this article, I’m going with the latter which means I’ve got separate executables for each Lambda function.
The notion of shared code seems to come up all the time. With compiled languages like Rust, layers don’t make much sense unless it’s an extension. So for sharing code, I’m using Rust’s crate system to build a lib that can be referenced by each Lambda. All of this is accomplished by using Cargo’s Workspace concept.
In the root of the project, there is a top-level Cargo.toml file that looks like this:
[workspace]
members = [
    "lambdas/shared",
    "lambdas/post",
    "lambdas/get-by-id",
    "lambdas/delete-by-id",
    "lambdas/put-by-id",
    "lambdas/get-all",
]
resolver = "2"
By having a Cargo file that defines the workspace, I can have different binaries share some of the same code while also isolating those same binaries with their specific builds and dependencies.
Working through the Code
The way that I generally think about building APIs is this. I like to think about the data model and access patterns first. This is true even if I’m using an RDBMS. In this article, to build an API with Rust and Lambda I’m using DynamoDB but the same principles apply. Once I’ve got a model and some access patterns, I like to work back up to the top and think about my endpoints and the contracts. My first endpoint is usually a POST so I can create items. And that’s where I’ll begin.
Creating Items
The create item Lambda is located in the lambdas/post directory and is marked in Cargo as a bin or binary project. Each Lambda in the API has the opportunity to define its own dependencies and package-specific settings. I mentioned above that I have a shared library crate, it’s defined in the Cargo file like this:
[dependencies]

shared = { path = "../shared" }
I tend to put models like entities and data transfer objects in shared. Other things that go in there are client creation, response building, and errors. The things that get reused and cut down on code duplication without creating unnecessary dependencies are perfect for this library.
Back to the create item Lambda.
I’m only going to walk through the main function once because it looks almost identical in each Lambda.
Main Function
In a language like Rust, main is the entry point for the compiled program. As I mentioned earlier, this API with Rust and Lambda contains a binary for each endpoint. My function definition sets up defaults, builds the DyanmoDB client, and sets up the handler to be executed.
#[tokio::main]
async fn main() -> Result<(), Error> {
    // Logging and trace output
    let filtered_layer = tracing_subscriber::fmt::layer()
        .pretty()
        .json()
        .with_target(true)
        .with_file(true)
        .with_filter(LevelFilter::INFO);

    tracing_subscriber::registry().with(filtered_layer).init();

    // helps direct how to build the DynamoDB client
    let is_local = std::env::var("IS_LOCAL").unwrap_or("false".to_string());
    let client = shared::clients::lambda_ddb_client::new_client(is_local).await;
    let table_name = &std::env::var("TABLE_NAME").expect("TABLE_NAME must be set");
    let shared_client = &client;

    // the handler code
    run(service_fn(move |event: Request| async move {
        function_handler(table_name, shared_client, event).await
    }))
    .await
}
The things to pay attention to in this function are that I’m using an IS_LOCAL variable and expecting a TABLE_NAME variable so that I can build the shared DynamoDB client. By building a shared client, I get reuse out of that object and don’t have to go through the latency of building it up each time.
Create Handler
I’m going to do the same thing on this handler as I did with the main function in that I’ll share more details and then in subsequent handlers just highlight the important pieces. The full source code is available at the bottom of the article.
async fn function_handler(
    table_name: &str,
    client: &Client,
    event: Request,
) -> Result<impl IntoResponse, Error> {
    let body = event.payload::<BasicEntityCreateDto>()?;
    let mut return_body = json!("").to_string();
    let mut status_code = StatusCode::OK;

    match body {
        Some(v) => {
            let e: BasicEntity = v.into();
            let r = create_item(client, table_name, e).await;

            match r {
                Ok(v) => {
                    let dto = BasicEntityViewDto::from(v);
                    return_body = serde_json::to_string(&dto).unwrap();
                }
                Err(e) => {
                    error!("Error saving entity: {}", e);
                    status_code = StatusCode::BAD_REQUEST;
                    return_body = serde_json::to_string("Error saving entity").unwrap()
                }
            }
        }
        None => {
            status_code = StatusCode::BAD_REQUEST;
        }
    }

    let response = Response::builder()
        .status(status_code)
        .header("Content-Type", "application/json")
        .body(return_body)
        .map_err(Box::new)?;
    Ok(response)
}
Breaking down the handler
The first item I want you to pay attention to is let body = event.payload::<BasicEntityCreateDto>()?;. This code converts the incoming request into my custom data transfer object that is in the shared library. That struct is defined with a few fields. Notice the macros for Debug and Deserialize that help with tracing and automatic conversion from JSON to this struct.
#[derive(Debug, Deserialize)]
pub struct BasicEntityCreateDto {
    pub name: String,
    pub description: String,
}
Auto conversion
The next block of code that will play itself out in the other handlers is the conversion of structs and the operations with the database. I tend to work with my domain models and DynamoDB, not my DTOs.
let e: BasicEntity = v.into();
let r = create_item(client, table_name, e).await;
This auto-conversion is handled by the DTO implementing the into trait.
impl Into<BasicEntity> for BasicEntityCreateDto {
    fn into(self) -> BasicEntity {
        let ksuid = Ksuid::new(None, None);
        let dt = Utc::now();
        let timestamp: i64 = dt.timestamp();

        BasicEntity::new(
            ksuid.to_string(),
            self.name,
            self.description,
            "BasicEntity".to_string(),
            timestamp,
            timestamp,
        )
    }
}
Working with DynamoDB
I wouldn’t have an API with Rust and Lambda without storing the entities that I’m working with. The AWS SDK for Rust is a breeze to work with and makes interacting with DynamoDB efficient and predictable. The put_item function creates the DynamoDB PutItemRequest and then executes it.
client
    .put_item()
    .item("id".to_string(), AttributeValue::S(item.get_id()))
    .item("name".to_string(), AttributeValue::S(item.get_name()))
    .item(
        "description".to_string(),
        AttributeValue::S(item.get_description()),
    )
    .item(
        "entity_type".to_string(),
        AttributeValue::S(item.get_entity_type()),
    )
    .item(
        "updated_at".to_string(),
        AttributeValue::N(item.get_updated_at().to_string()),
    )
    .item(
        "created_at".to_string(),
        AttributeValue::N(item.get_created_at().to_string()),
    )
    .table_name(table_name)
    .send()
    .await
{
    Ok(_) => Ok(item),
    Err(e) => Err(e.into()),
}
One of the things you’ll see in the Err block of this put is that I’ve also made a call to into(). In the repository under the shared library, I have an enum with these values. And for each of those values I provide a conversion so that I can take an error from say Serde or the AWS SDK and convert it into something that I want. This is a technique for building custom errors with Rust.
#[derive(Error, Debug)]
pub enum QueryError {
    #[error("failed to parse response into a user: {0}")]
    SerdeError(serde_dynamo::Error),
    #[error("aws_sdk_dynamodb error: {0}")]
    DynamoError(aws_sdk_dynamodb::Error),
    #[error("aws_sdk_dynamodb::error:: error: {0}")]
    DynamoSdkError(String),
    #[error("item not found")]
    NotFound,
}
Get and Put by ID
The GET and PUT by ID functions in an API with Rust and Lambda don’t have a great deal of nuance to them but I do want to highlight how to access path variables which are common to both of these handlers.
Accessing path variables
Throughout this project, I’m using the lambda_http crate that is provided by the AWS Labs team. There are several useful functions that this crate provides and one of them is working with the path and query string parameters.
Any Lambda in the API that works with the path will need to be able to fetch out those key elements. In my case, I have an {id} in the path that I need to fetch.
let path_id = request
    .path_parameters_ref()
    .and_then(|params| params.first("id")).unwrap();
The above code will return an &str that I can then further use in the handler. I generally don’t want to unwrap() something but rather evaluate the Option but in this case, API Gateway won’t call this function if it’s missing a path variable. So it’s safe in that regard.
Working with DynamoDB
I highlighted above how to execute a PutItem request but I haven’t shown the Query request. I use this query in the Get and Put to make sure I have the right item and can then apply any updated values on the BasicEntity.
let output = client
    .get_item()
    .key("id".to_string(), AttributeValue::S(id.to_string()))
    .table_name(table_name)
    .send()
    .await?;

match output.item {
    Some(item) => {
        let i: BasicEntity = serde_dynamo::from_item(item)?;
        Ok(i)
    }
    None => Err(QueryError::NotFound),
}
Again, working with DynamoDB via the SDK is straightforward. I’m issuing a get_item with the key defined with the name id and the type AttributeValue::S. In the case that I don’t find an item, I’m using my custom QueryError to bring back a NotFound result.
Deleting an Item
My API with Rust and Lambda wouldn’t be complete without a DELETE endpoint. Deleting in DynamoDB with the SDK is just as well supported as the other operations. My handler also doesn’t differ that much other than I’m returning 204 NO_CONTENT vs the 200 or 201 I’m returning in other handlers.
let mut status_code = StatusCode::NO_CONTENT;

match path_id {
    Some(id) => {
        let i: Result<(), QueryError> = delete_item(client, table_name, id).await;
        match i {
            Ok(_) => {}
            Err(_) => {
                status_code = StatusCode::NOT_FOUND;
            }
        }
    }
    None => {
        status_code = StatusCode::NOT_FOUND;
    }
}
The part that is worth mentioning is how I know that the DynamoDB API returned that the was not found. By requesting the old values of the item and then checking for attributes.
// the builder is above here
.return_values(aws_sdk_dynamodb::types::ReturnValue::AllOld)

// checking attributes
match output.attributes() {
    Some(_) => Ok(()),
    None => Err(QueryError::NotFound),
}
Get items with pagination
The last piece of this API with Rust and Lambda that I want to walk through is how to build a paginated API with the SDK.
My handler code looks a lot like other handlers, but instead of using the path, I’m looking for lk in the query string. This lk equals the last key that was evaluated in the query I’m about to walk through. With the last key, I can tell the DynamoDB API where to start in the records. I’m using a scan for this because I’m looking at all of the records in the table but limiting the number I’m pulling at a time.
let last_key = request
    .query_string_parameters_ref()
    .and_then(|params| params.first("lk"))
    .unwrap_or_else(|| "")
    .to_string();
Unlike other operations where I’m unwrapping the value in the path parameters, I’m using unwrap_or_else so that I don’t experience a panic from accessing something that has no value. If nothing is in the lk parameter, I’m just using "".
The query
Querying all of the items in the table for our API with Rust and Lambda follows the same patterns that are in the other DynamoDB SDK functions.
However, I first want to build the last key expression. Since my table has one key, I only have one value in the Hashmap that ultimately must be an Option.
let mut key = None;

if last_key != "" {
    let mut evaluated_key: HashMap<String, aws_sdk_dynamodb::types::AttributeValue> =
        HashMap::new();
    evaluated_key.insert(
        "id".to_string(),
        aws_sdk_dynamodb::types::AttributeValue::S(last_key),
    );
    key = Some(evaluated_key);
}
I can then set the start key position by including it in the Scan Fluent Builder.
let output = client
    .scan()
    .set_exclusive_start_key(key)
    .limit(limit)
    .table_name(table_name)
    .send()
    .await?;
Lastly, if it’s present, make sure I send it back to the client so that they can supply the last key in subsequent requests to page through the records.
if output.last_evaluated_key.is_some() {
    let key = output.last_evaluated_key.unwrap();
    let key_value = key.get("id").unwrap();
    let string_value = key_value.as_s().unwrap().to_string();

    last_key = string_value;
}
Deploying and running
Before I wrap up the article, I want to demonstrate how to get the repository deployed and give you something to work with. I tried to find a nice balance of diving into code while also explaining the why. This approach and structure to building an API with Rust and Lambda have served me well when shipping to production and providing customer value. Using Cargo and a shared library crate also makes reuse a breeze.
Deploying
Being that this is a CDK project, deploying the API with Rust and Lambda requires running this command from the terminal.
cdk deploy
I’ve built this with a single stack that’ll deploy the Lambdas, DynamoDB Table, and API Gateway.
Running the API
Once deployed, visit the AWS Console and find the AWS-assigned URL to your new API Gateway. With that value, you can load Postman and launch the included Postman collection. It has a variable named API_ENDPOINT which is where the assigned URL needs to go.
My recommendation is you start with the POST endpoint, create some new items, and then explore from there.
Clean up
The last piece of this is that when you are done, just run cdk destroy in the project directory and everything will clean up.
Wrapping up
I struggled to put this piece together for a few weeks. I haven’t tackled something this big that shows this much of an application’s build. What spurred this on though is that I’m going to be using this piece in a couple of talks this spring. There has been a tremendous amount of interest in Rust and Serverless so I’m feeling grateful to have the opportunity to share how amazing the Rust and Lambda experience is. And I know that if something like this existed when I was starting my API with Rust and Lambda journey, I would have been thankful.
I’ve mentioned a few times the repository, and here is the link to all of the cod above and more. I’d recommend you clone the repository and start playing around. Learning Rust can be tough without a purpose, but learning Rust while building an API should help solidify some concepts.
The reasons for Rust in the Serverless ecosystem are numerous. It’s a solid language that is strongly typed, has a great library system, is highly-performant, and is a great choice if ecological sustainability matters to you. And with all of the amazing new content that seems to show up weekly, learning Rust and Serverless has never been easier.
Thanks so much for reading this piece and happy building!